
Common Mistakes:Are your images right for the internet?

Common Mistakes:Are your images right for the internet?
There are a few mistakes people continuously make while producing websites, applications, and content for the internet. Many Content Management System uploaders and social media share widgets have trained us that we can just drag and drop a file and the internet fairies will fix it for you. There is an expectation that when you upload an image, things like web optimized resolution and size are done on the fly. That might be true, but in many cases it is not and it's critical that we double check. Often we can get better results if we size our images correctly before sharing. Let me share a few gotchas to watch out for, without getting too technical.
Posting images that are too large
An image that is unnecessarily large will slow down your website significantly. Adding a few large images and your page takes too long to load, visitors will get tired of waiting and move on to something else. And it does affect your ranking, as google down prioritize slow loading sites, especially on mobile.
So you have an image you are going to post to the site, it could be from your camera, a stock photo source, a photographer, or sent you by a manager or a client. It doesn't matter where it came from or what the source says, always check the size. Your file size should be measured in KB (kilobytes) and not in MB (megabytes), and preferably be less than 100KB. The width of your image should be no wider than the maximum width of the area it will be displayed in.
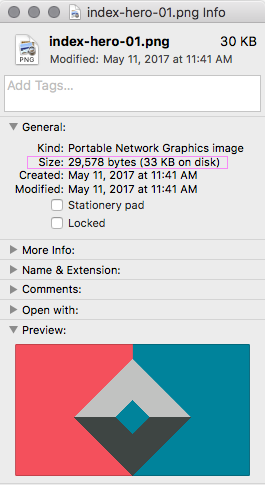
On a mac, you can check file size in finder: under "File" and then select "Get Info" when you have the file selected.
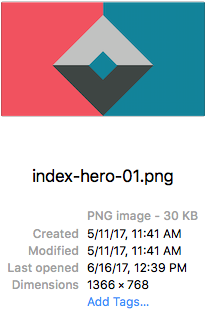
Info on dimensions is available in the preview of a file in a Finder window.
If you are checking on an image that is already posted to a site, you can inspect the site by right click on the image and choose "Inspect." For Safari the Web Inspector has to be turned on. This also works if you drag and drop an image into your browser window.

If the natural pixel dimensions are larger than the display area, there is room for optimization by resizing the image width to fit. If the image has been uploaded as a high-res photo, the natural dimension will be vastly greater, and the image should be replaced with a version that is 72 pixels per inch, (keeping it simple, let's leave retina support to another time).
Note, Studio Elsa is using source tag to serve up different images responsively. We can address this in a future post but for now here is a reference to how serving up responsive works.
Learn More: Optimizing Images for Web: A Practical Guide
Need help with content and structure?
If you are refining content for clarity and impact, we can help you make it easier to read and easier to use.
Start something